How to Make Sun-Dried Tomatoes (3 Methods)
Late-season tomatoes are one of those preservation problems that rewards planning. A few pounds of Roma tomatoes at peak ripeness can turn into a small jar of concentrated, shelf-stable flavor that holds through winter — no pressure canner, no complicated equipment, and no specialized skills required. The challenge is knowing which method fits your schedule and climate, and understanding the one storage decision that most beginner guides gloss over entirely.
Sun-dried tomatoes shrink dramatically during drying: roughly 8 to 10 pounds of fresh tomatoes yield about 1 pound dried. That concentration is the point. What you end up with is something far more useful in a pantry than the same weight of fresh fruit would be two weeks from now.
The method you choose matters, though. Each one has a different time commitment, equipment requirement, and result. This guide covers all three, walks through what doneness actually looks like, and explains the one storage decision that beginners most often get wrong.
To make sun-dried tomatoes at home, halve Roma or paste tomatoes, season with salt, and dry them in the oven at 200 to 225 degrees F for 4 to 8 hours, in a dehydrator at 135 degrees F for 10 to 18 hours, or in direct sun for 3 to 5 days. They are done when leathery but still pliable, not brittle.
Quick Answer
- Best tomatoes: Roma and paste varieties. High flesh-to-water ratio, fewer seeds, meatier result.
- Oven method: 200 to 225°F, 4 to 8 hours, cut-side up on a wire rack.
- Dehydrator method: 135°F, 10 to 18 hours, single layer on trays.
- Sun method: 3 to 5 days, 95°F or hotter, low humidity, covered with cheesecloth.
- Done when: leathery and pliable. Not wet. Not snapping-crisp.
- Dry-pack storage: airtight container, up to a year at room temperature.
- Oil-pack storage: refrigerator only, use within approximately 2 to 4 weeks.
Which Tomatoes Work Best (and Which Will Disappoint You)
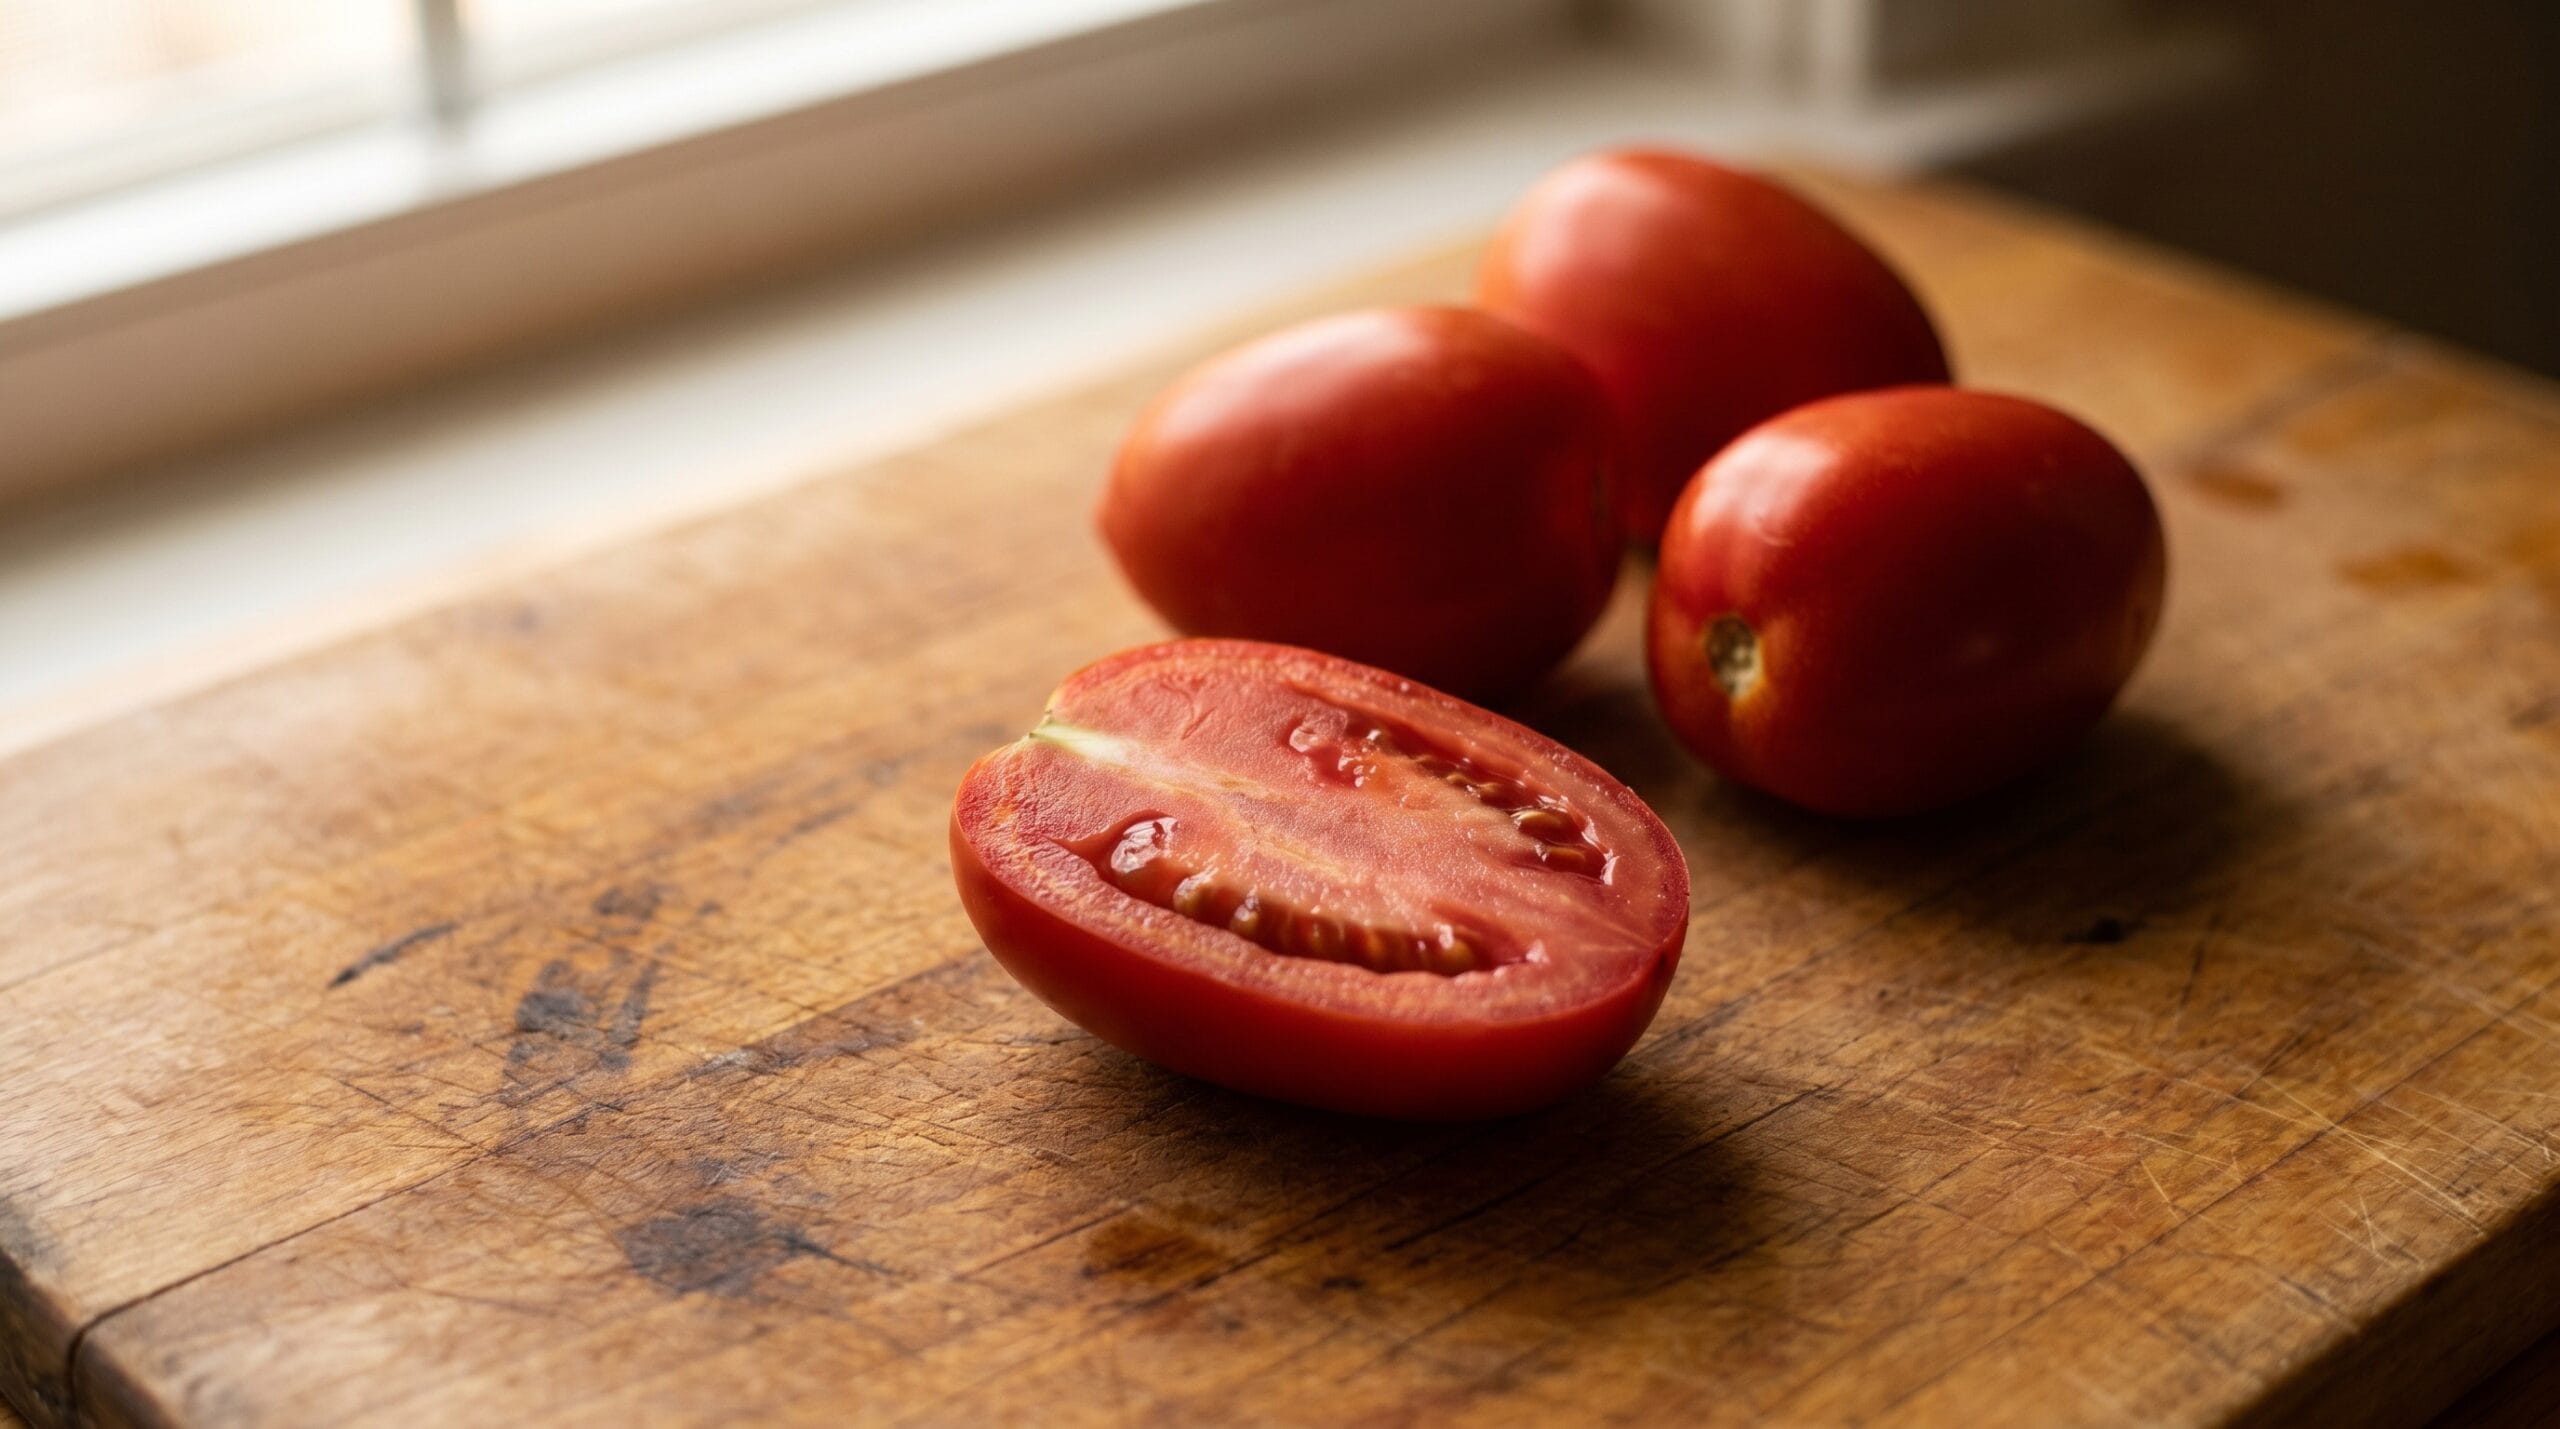
Not every tomato is worth drying. The core issue is water content. A tomato that is mostly juice and seeds will spend most of its drying time releasing water and end up a thin, tough sliver with not much flavor to show for it.
Roma and paste tomatoes are the right starting point. Their flesh-to-water ratio is high: thick walls, a small seed cavity, and dense flesh that concentrates into something genuinely meaty. San Marzano varieties work on the same principle. You can usually find them at farmers’ markets right when late-season tomatoes are at their best, which is when you want to be doing this anyway.
Beefsteak and large slicing tomatoes are the wrong choice for drying. They have too much moisture and tend to collapse into something soft and uneven. If the tomatoes on your counter are large slicers, make sauce or sandwiches with them instead.
Cherry tomatoes can work, but halving them at any real scale is tedious, and they have variable moisture depending on variety. If you want to try them, cut in half and expect the oven time to run toward the shorter end of the range.
Two practical points. First, pick tomatoes at peak ripeness: deep red, firm, no soft spots or cracks. Under-ripe tomatoes will give you a dull, slightly acidic result. Second, sort your batch so the tomatoes are roughly the same size before you start. In a mixed-size batch, smaller ones will be over-dried and starting to turn brittle before the larger ones are even close to done.
How Long Each Method Actually Takes (Real Time, Start to Finish)

Most recipes give you the active drying time and leave out everything else. Here is what a complete batch actually looks like from start to finish.
Oven method:
Prep (washing, coring, halving, patting dry, seasoning): 20 to 30 minutes for about 3 to 4 pounds of tomatoes. Drying: 4 to 8 hours at 200 to 225°F, checked every 90 minutes or so in the second half. Cooling before storage: 30 minutes. Total elapsed time: roughly 5 to 9 hours, most of which you spend doing other things while the oven runs.
Dehydrator method:
Prep follows the same steps as the oven method: 20 to 30 minutes. Drying: 10 to 18 hours at 135°F depending on tomato thickness and the dehydrator model. Many people start a dehydrator batch in the evening and pull the trays the following morning. Total elapsed time: 11 to 19 hours. The advantage is that a dehydrator runs unattended with even heat distribution, so you do not need to rotate or check as frequently.
Sun method:
Prep follows the same steps. Drying: 3 to 5 consecutive days of temperatures above 95°F and low humidity. Bring trays inside at night to prevent moisture reabsorption. Total elapsed time: 4 to 6 days of actual calendar time, though your hands-on time is minimal. The real constraint is not effort but weather. This method is practical in parts of the Southwest and California during summer. In humid regions or anywhere with variable cloud cover, it is genuinely unreliable.
If you are choosing based on schedule, the oven is the most practical for most beginners. The dehydrator is the most consistent if you already own one or plan to buy one — entry-level models run roughly $40 to $100, though prices vary by brand and retailer.
Three Methods: Oven, Dehydrator, and Sun
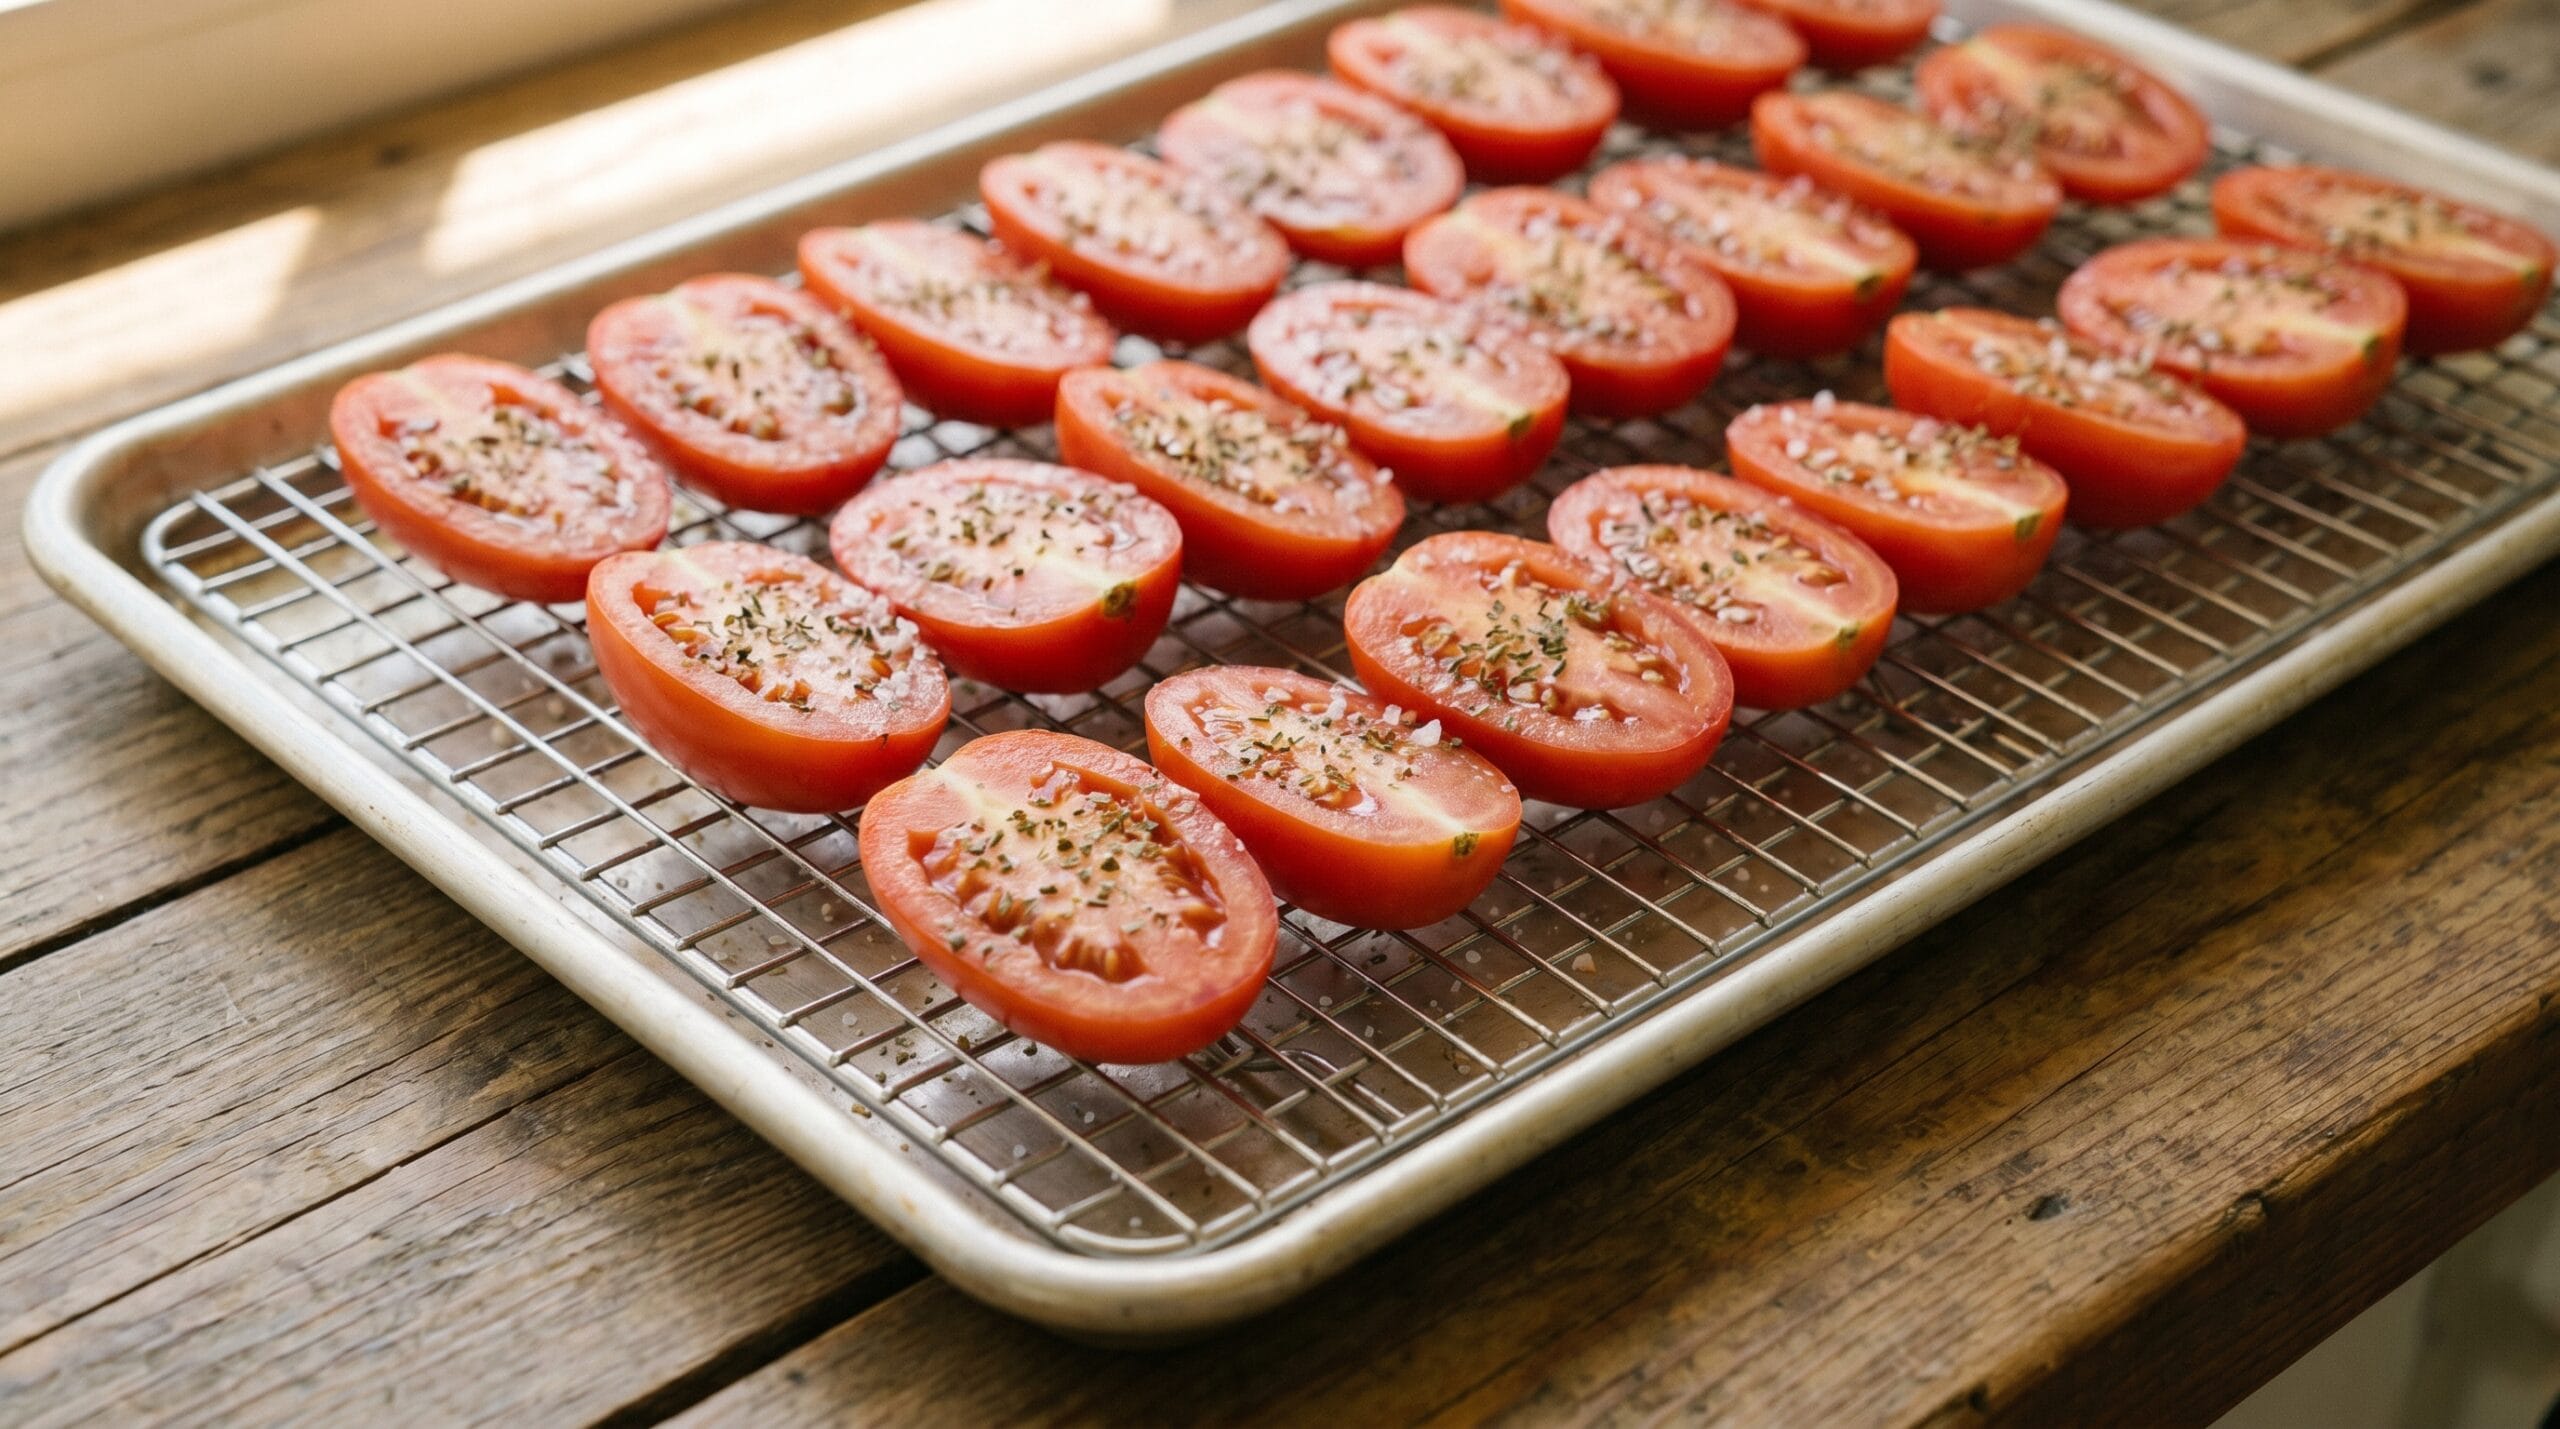
All three methods share the same prep steps. Wash the tomatoes, core them, halve them lengthwise, and pat the cut sides dry with a clean towel. Season and arrange flesh-side up before drying.
Oven Method
Preheat your oven to 200 to 225°F. If you are unsure whether your oven holds temperature accurately in this range, an inexpensive oven thermometer will tell you quickly — many home ovens cycle unevenly at low settings, which can extend drying time or cause uneven results. Set a wire rack over a rimmed baking sheet; this allows air circulation under the tomatoes and prevents them from sitting in pooled liquid. Place the halved tomatoes flesh-side up, evenly spaced so they are not touching. Season with salt.
Slide the baking sheet into the oven and leave it for 4 hours before checking. What you are looking for at each check is whether the tomatoes are still giving off visible moisture or whether they are beginning to dry and shrink at the edges. Rotate the pan at each check. Most batches finish between 4 and 8 hours, though larger paste tomatoes may go longer.
Leave the oven door slightly ajar if your oven holds heat tightly or runs warm. A wooden spoon propped in the door works fine for this.
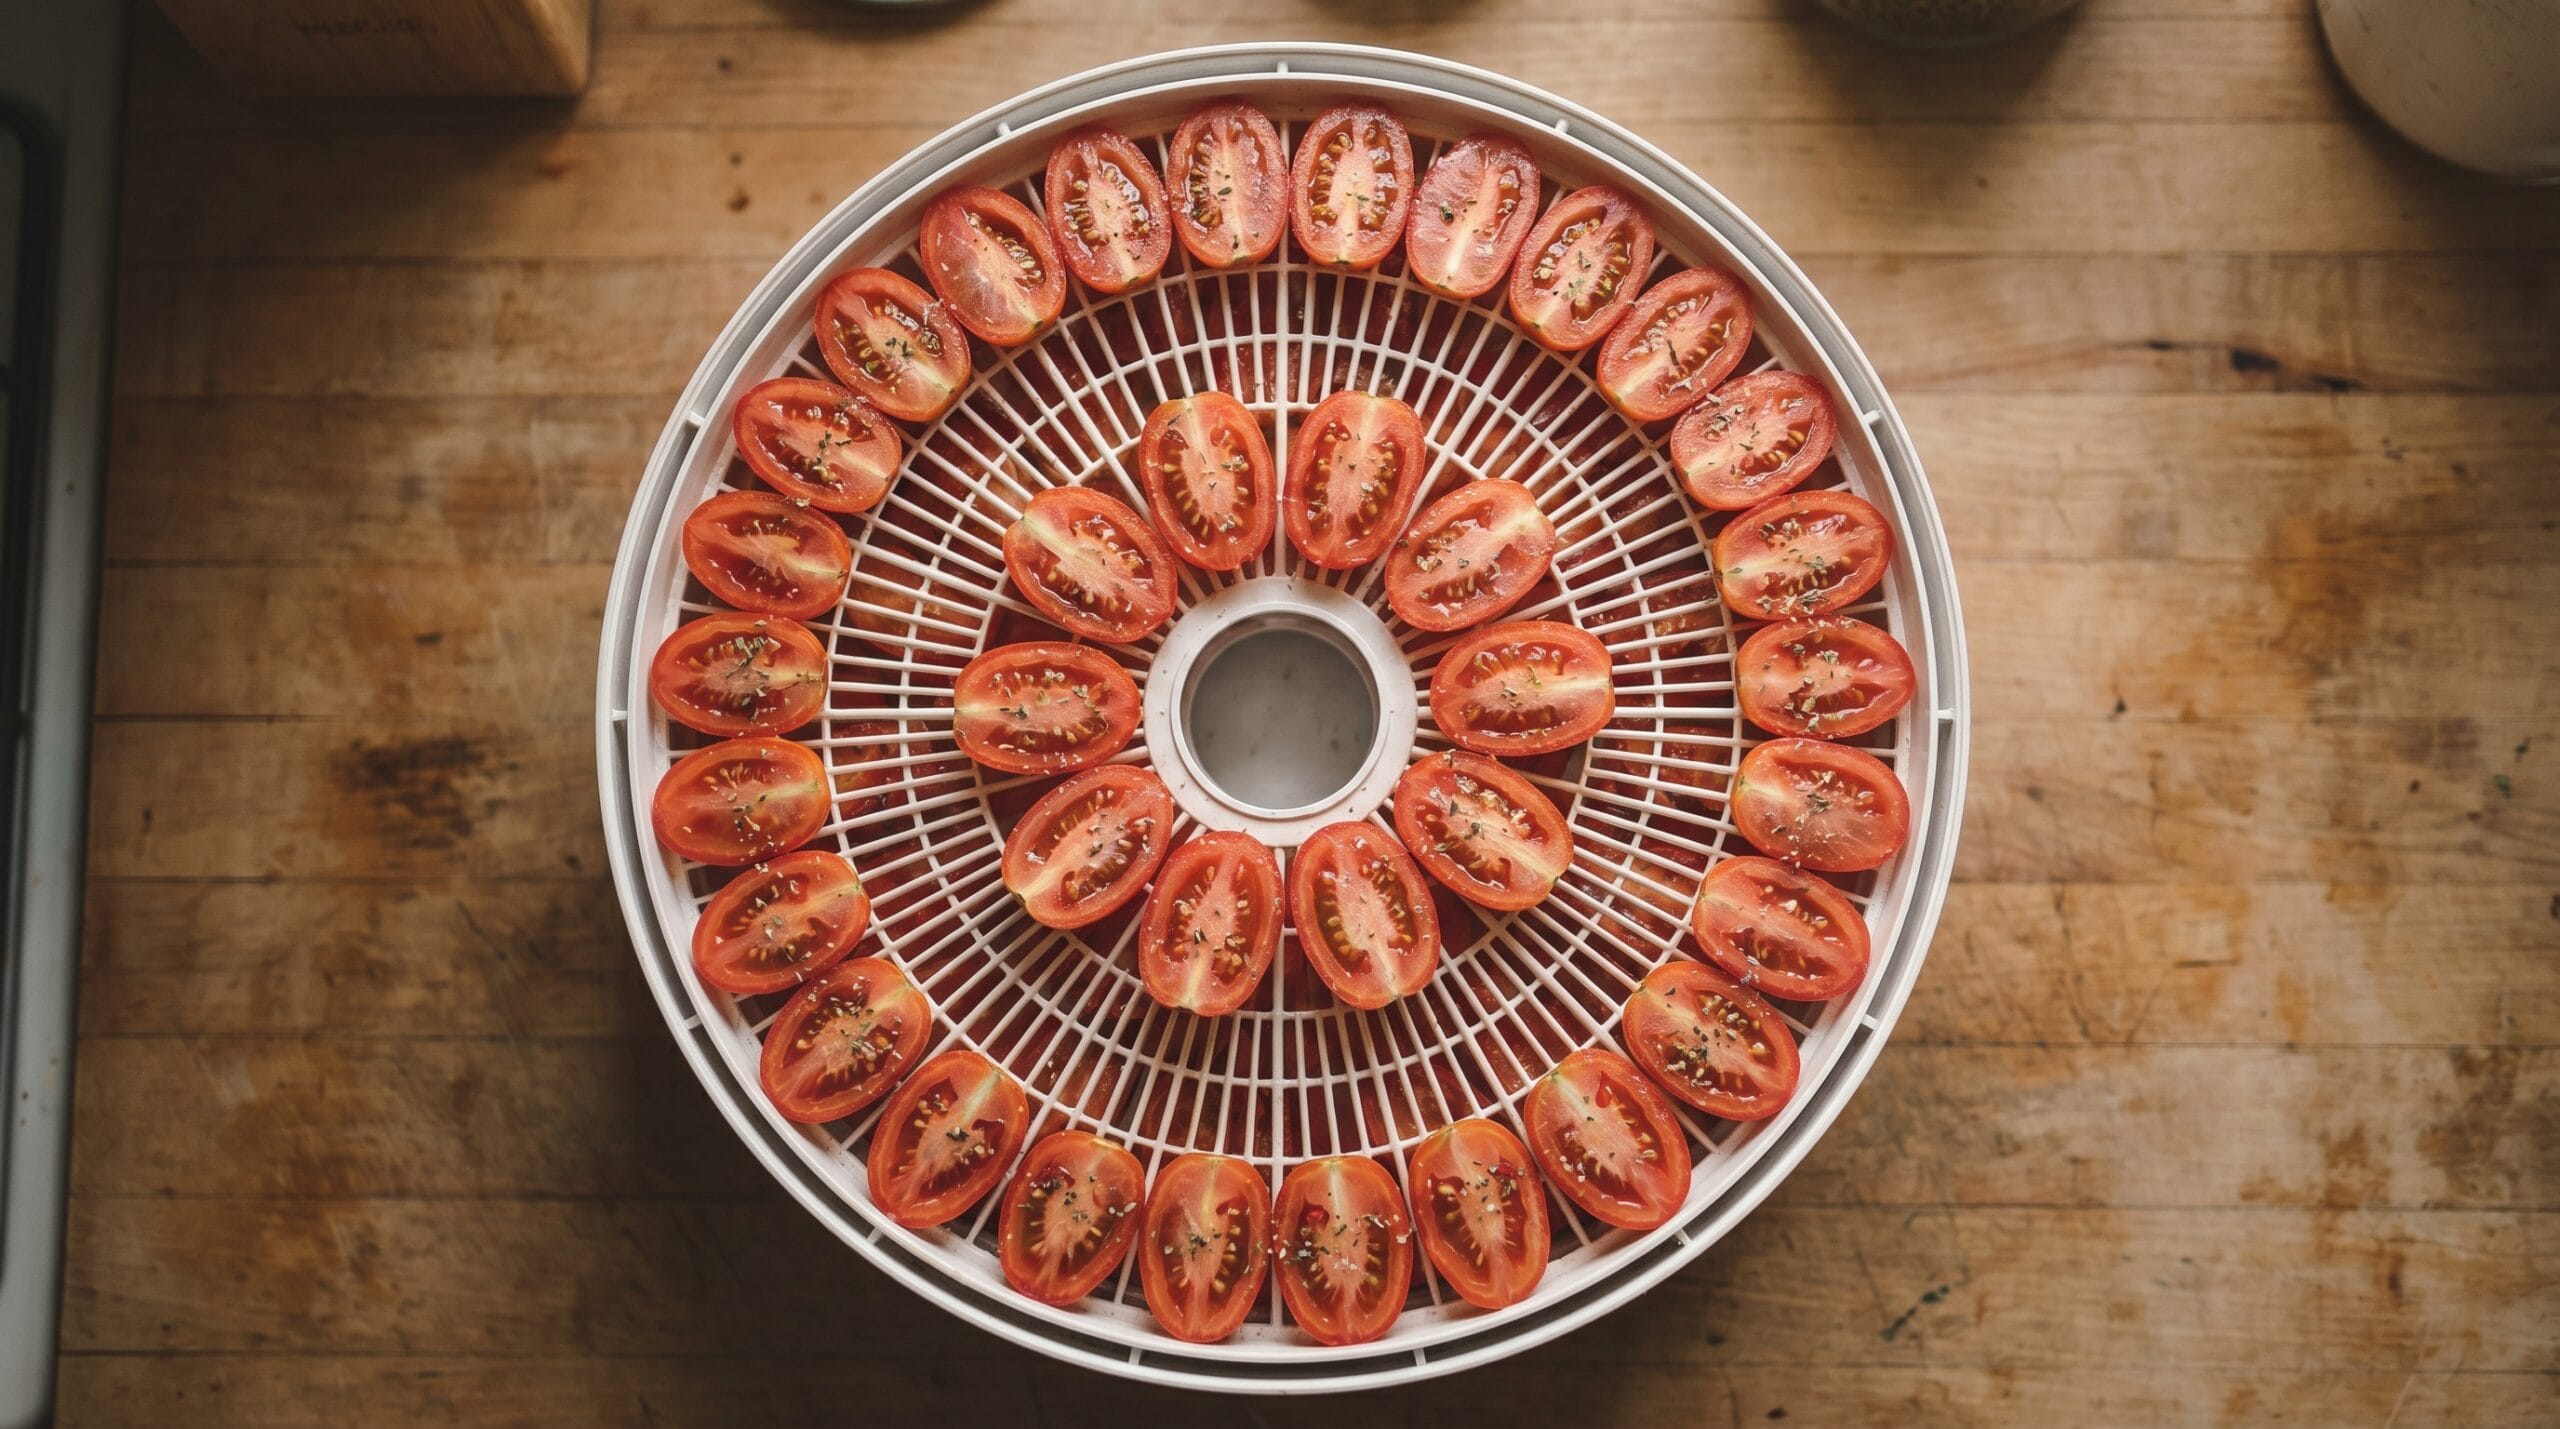
Dehydrator Method
Set the dehydrator to 135°F. Arrange tomato halves flesh-side up in a single layer per tray with space between each piece. Crowded trays slow the process and lead to uneven results.
Most batches dry in 10 to 18 hours. Thinner-walled tomatoes will finish earlier; thicker paste varieties will take the full range. Check at the 10-hour mark and every couple of hours after that. Rotate trays top-to-bottom partway through if your dehydrator has bottom-mounted heat.
Sun Method
You need at least 3 to 5 consecutive days of temperatures above 95°F and genuinely low humidity. Set the tomatoes open face down on clean wooden or mesh drying trays and cover loosely with cheesecloth to keep insects and debris off. Elevate the trays on a table or stand in full direct sun.
Bring the trays inside at night. Even in hot climates, overnight moisture will undo progress. Flip the tomatoes once per day. By day 3, start checking texture. In a greenhouse with good airflow and summer heat, some batches finish on the faster end of this range.
This method is not recommended in the Southeast, the Pacific Northwest, or anywhere that sees summer humidity above 60 percent. The tomatoes will take on moisture faster than they release it and may begin to mold before they are dry.
Seasoning Options (Simple or More Complex)
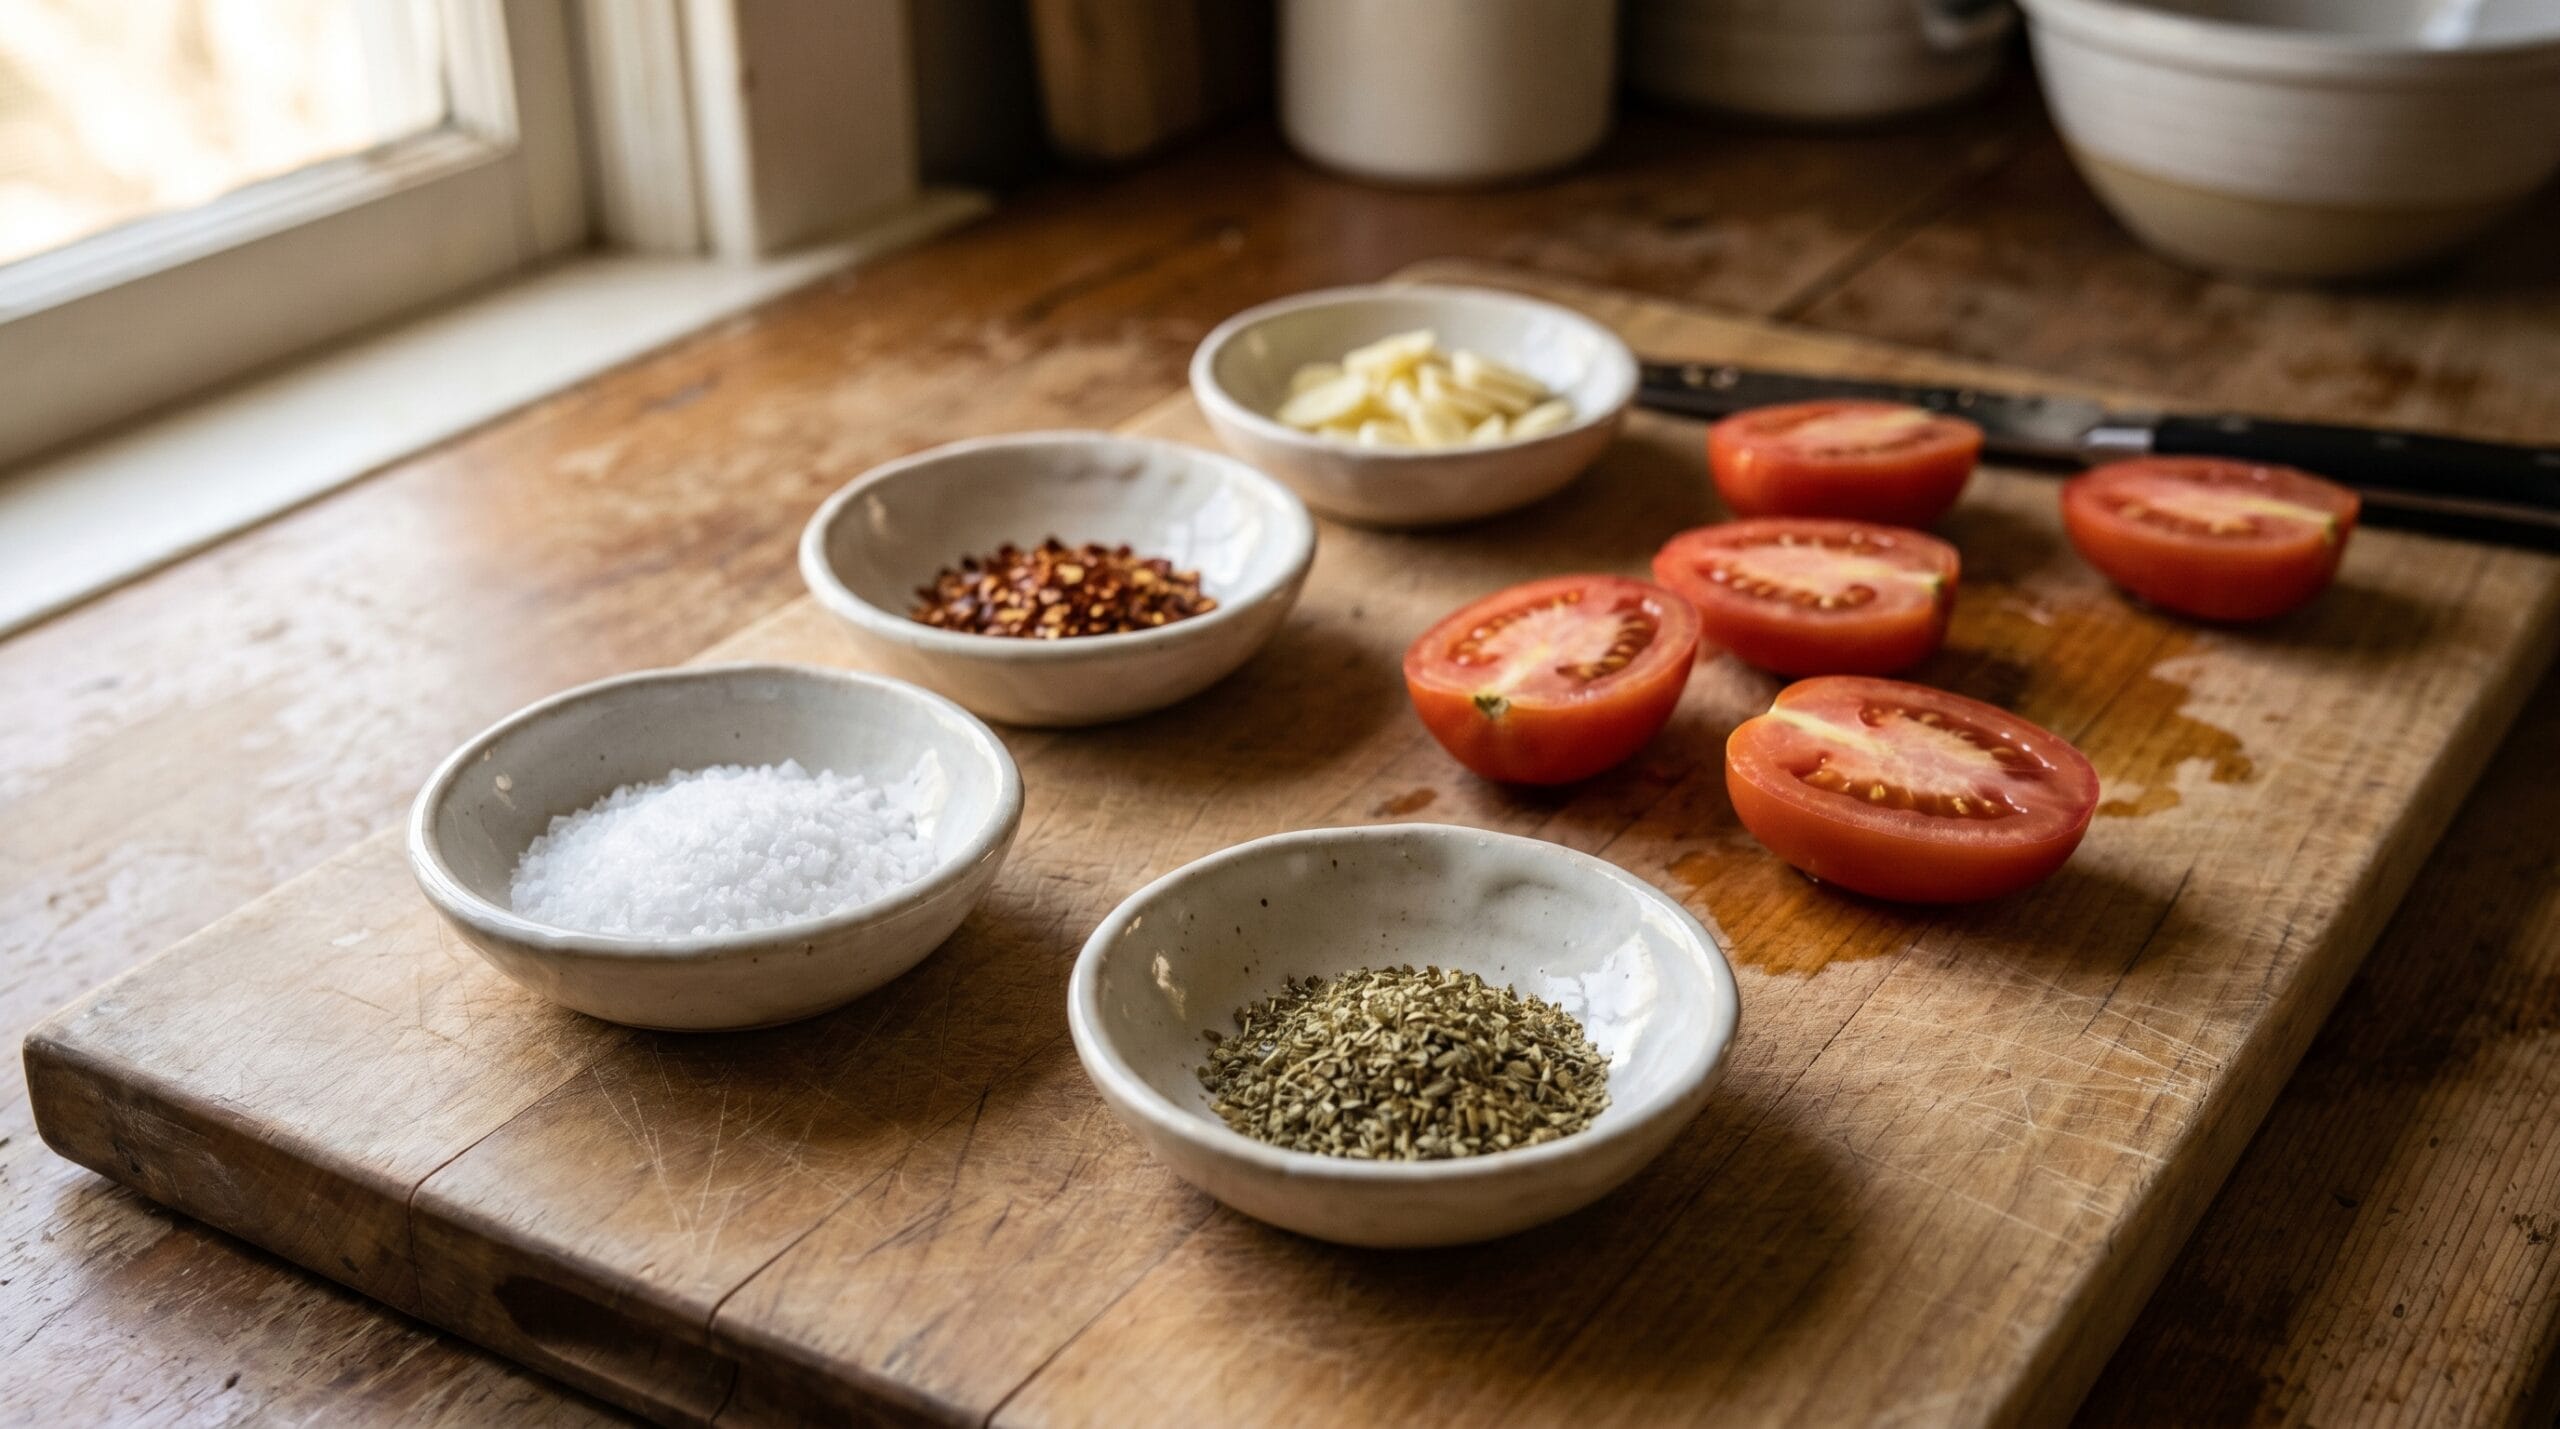
Salt is the baseline. It draws moisture out of the tomato flesh and concentrates flavor. Use roughly half a teaspoon of kosher salt per pound of halved tomatoes, sprinkled evenly over the cut surfaces before the tomatoes go into the oven or dehydrator.
Beyond salt, a few additions hold up well through the drying process:
- Dried oregano or thyme: a light pinch per tray. Dried herbs can handle the heat; fresh herbs may char at low oven temperatures or become papery.
- Red pepper flakes: a small pinch adds background heat that deepens during drying.
- Garlic: thinly sliced and pressed lightly onto the cut surface. One or two small slices per tomato half is enough. The garlic will also dry during the process and end up slightly crisp. Note that dried garlic added at this stage is safe for dry-pack storage; the safety concern with garlic applies specifically to oil-packed storage, covered in the storage section below.
- Onion powder: works fine in small amounts. Fresh onion adds too much moisture to the surface and disrupts even drying, so skip it.
One important note: flavors concentrate during drying. What tastes lightly seasoned going into the oven can taste assertive coming out. Season more gently than instinct suggests, especially with salt and red pepper.
How to Tell When Sun-Dried Tomatoes Are Done (and What Happens If You Get It Wrong)
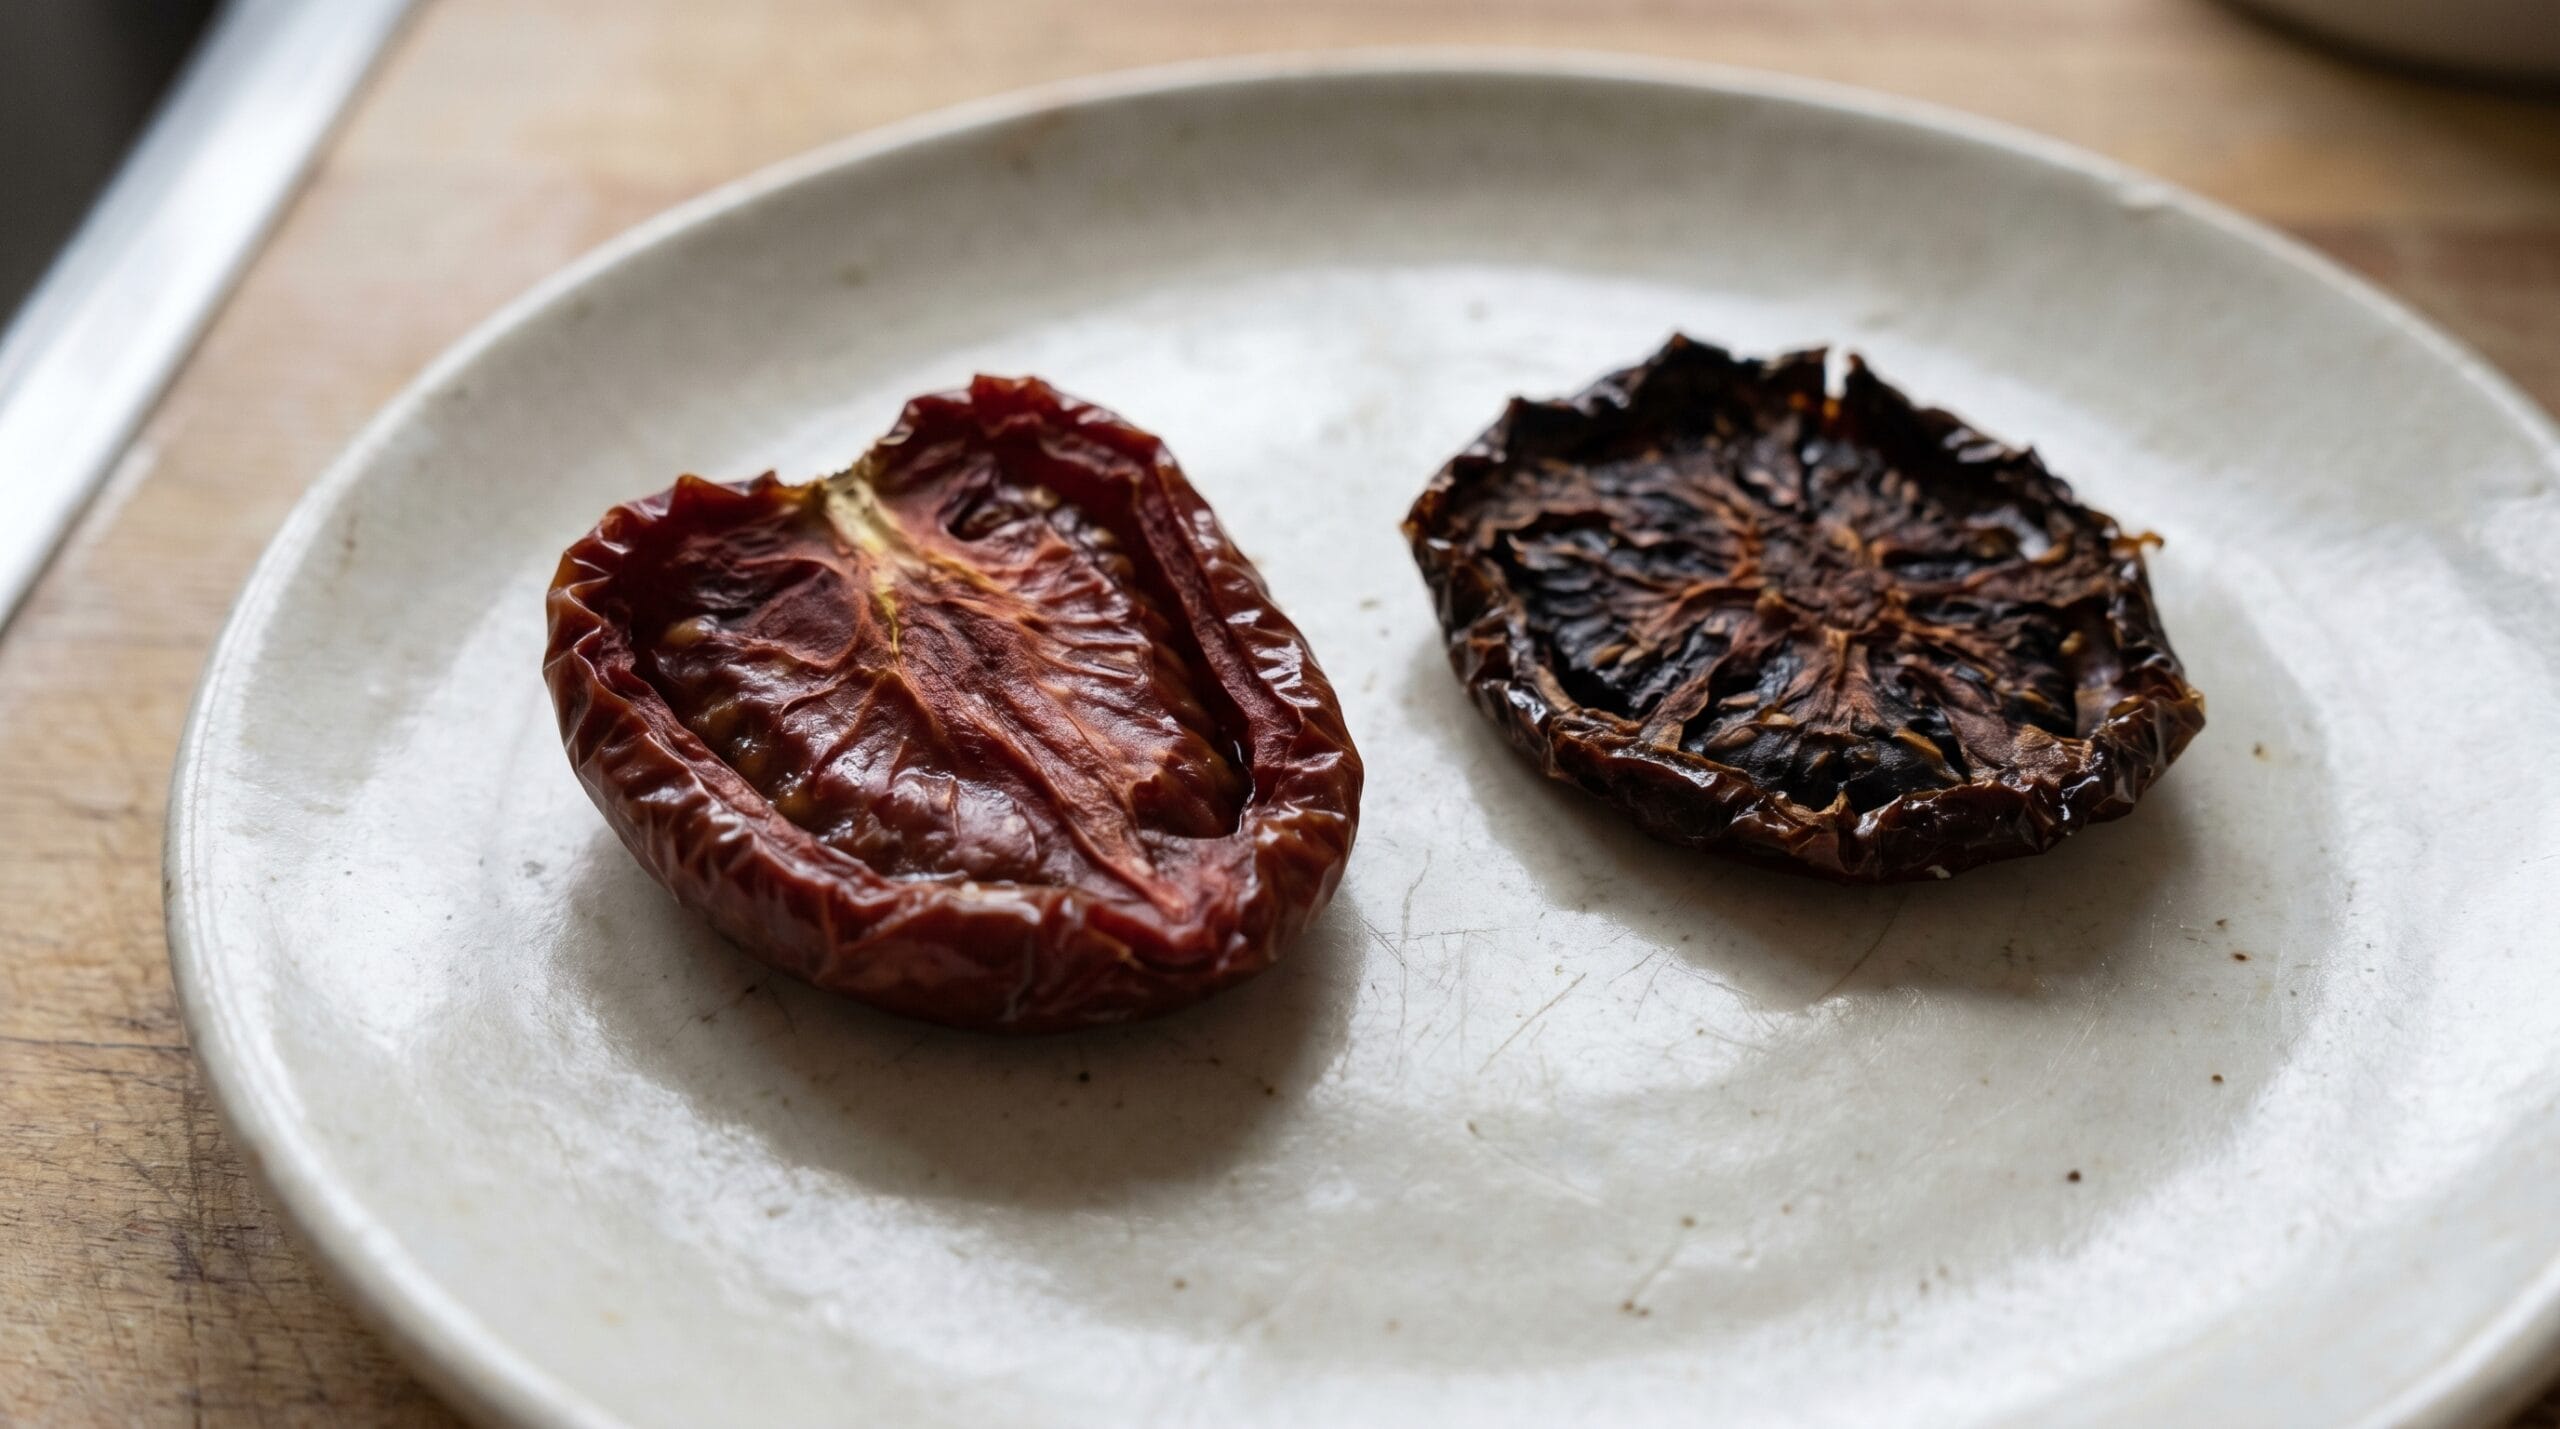
The texture test is the reliable indicator. A finished sun-dried tomato should be flexible without cracking: you can bend it without it snapping, but it should not feel wet, sticky, or soft when you press it. Think of the texture of a dried apricot from a good batch.
Two things go wrong when you miss this target:
Under-dried: Tomatoes that still have significant moisture left will mold during storage. This is not a minor inconvenience. According to the National Center for Home Food Preservation, under-dried tomatoes with residual moisture will mold; the leathery-but-pliable texture test is the reliable doneness indicator. If you pull a batch and some pieces feel soft or sticky after cooling, dry them further before storing.
Over-dried: Tomatoes that go too long become brittle and snap. They will not rehydrate well and have a tougher, papery texture in cooked dishes. They are safe to eat but noticeably worse. Check your batch regularly in the final hours to avoid this.
Pull the tomatoes from the heat source and let them cool completely on the rack before testing texture. Hot tomatoes will feel more pliable than they actually are at room temperature. Give them 20 to 30 minutes before making a final call.
How to Store Sun-Dried Tomatoes Safely (Dry Pack vs. Oil Pack Trade-Offs)
This is the section most beginner guides skip, and it is where the most significant mistake happens.
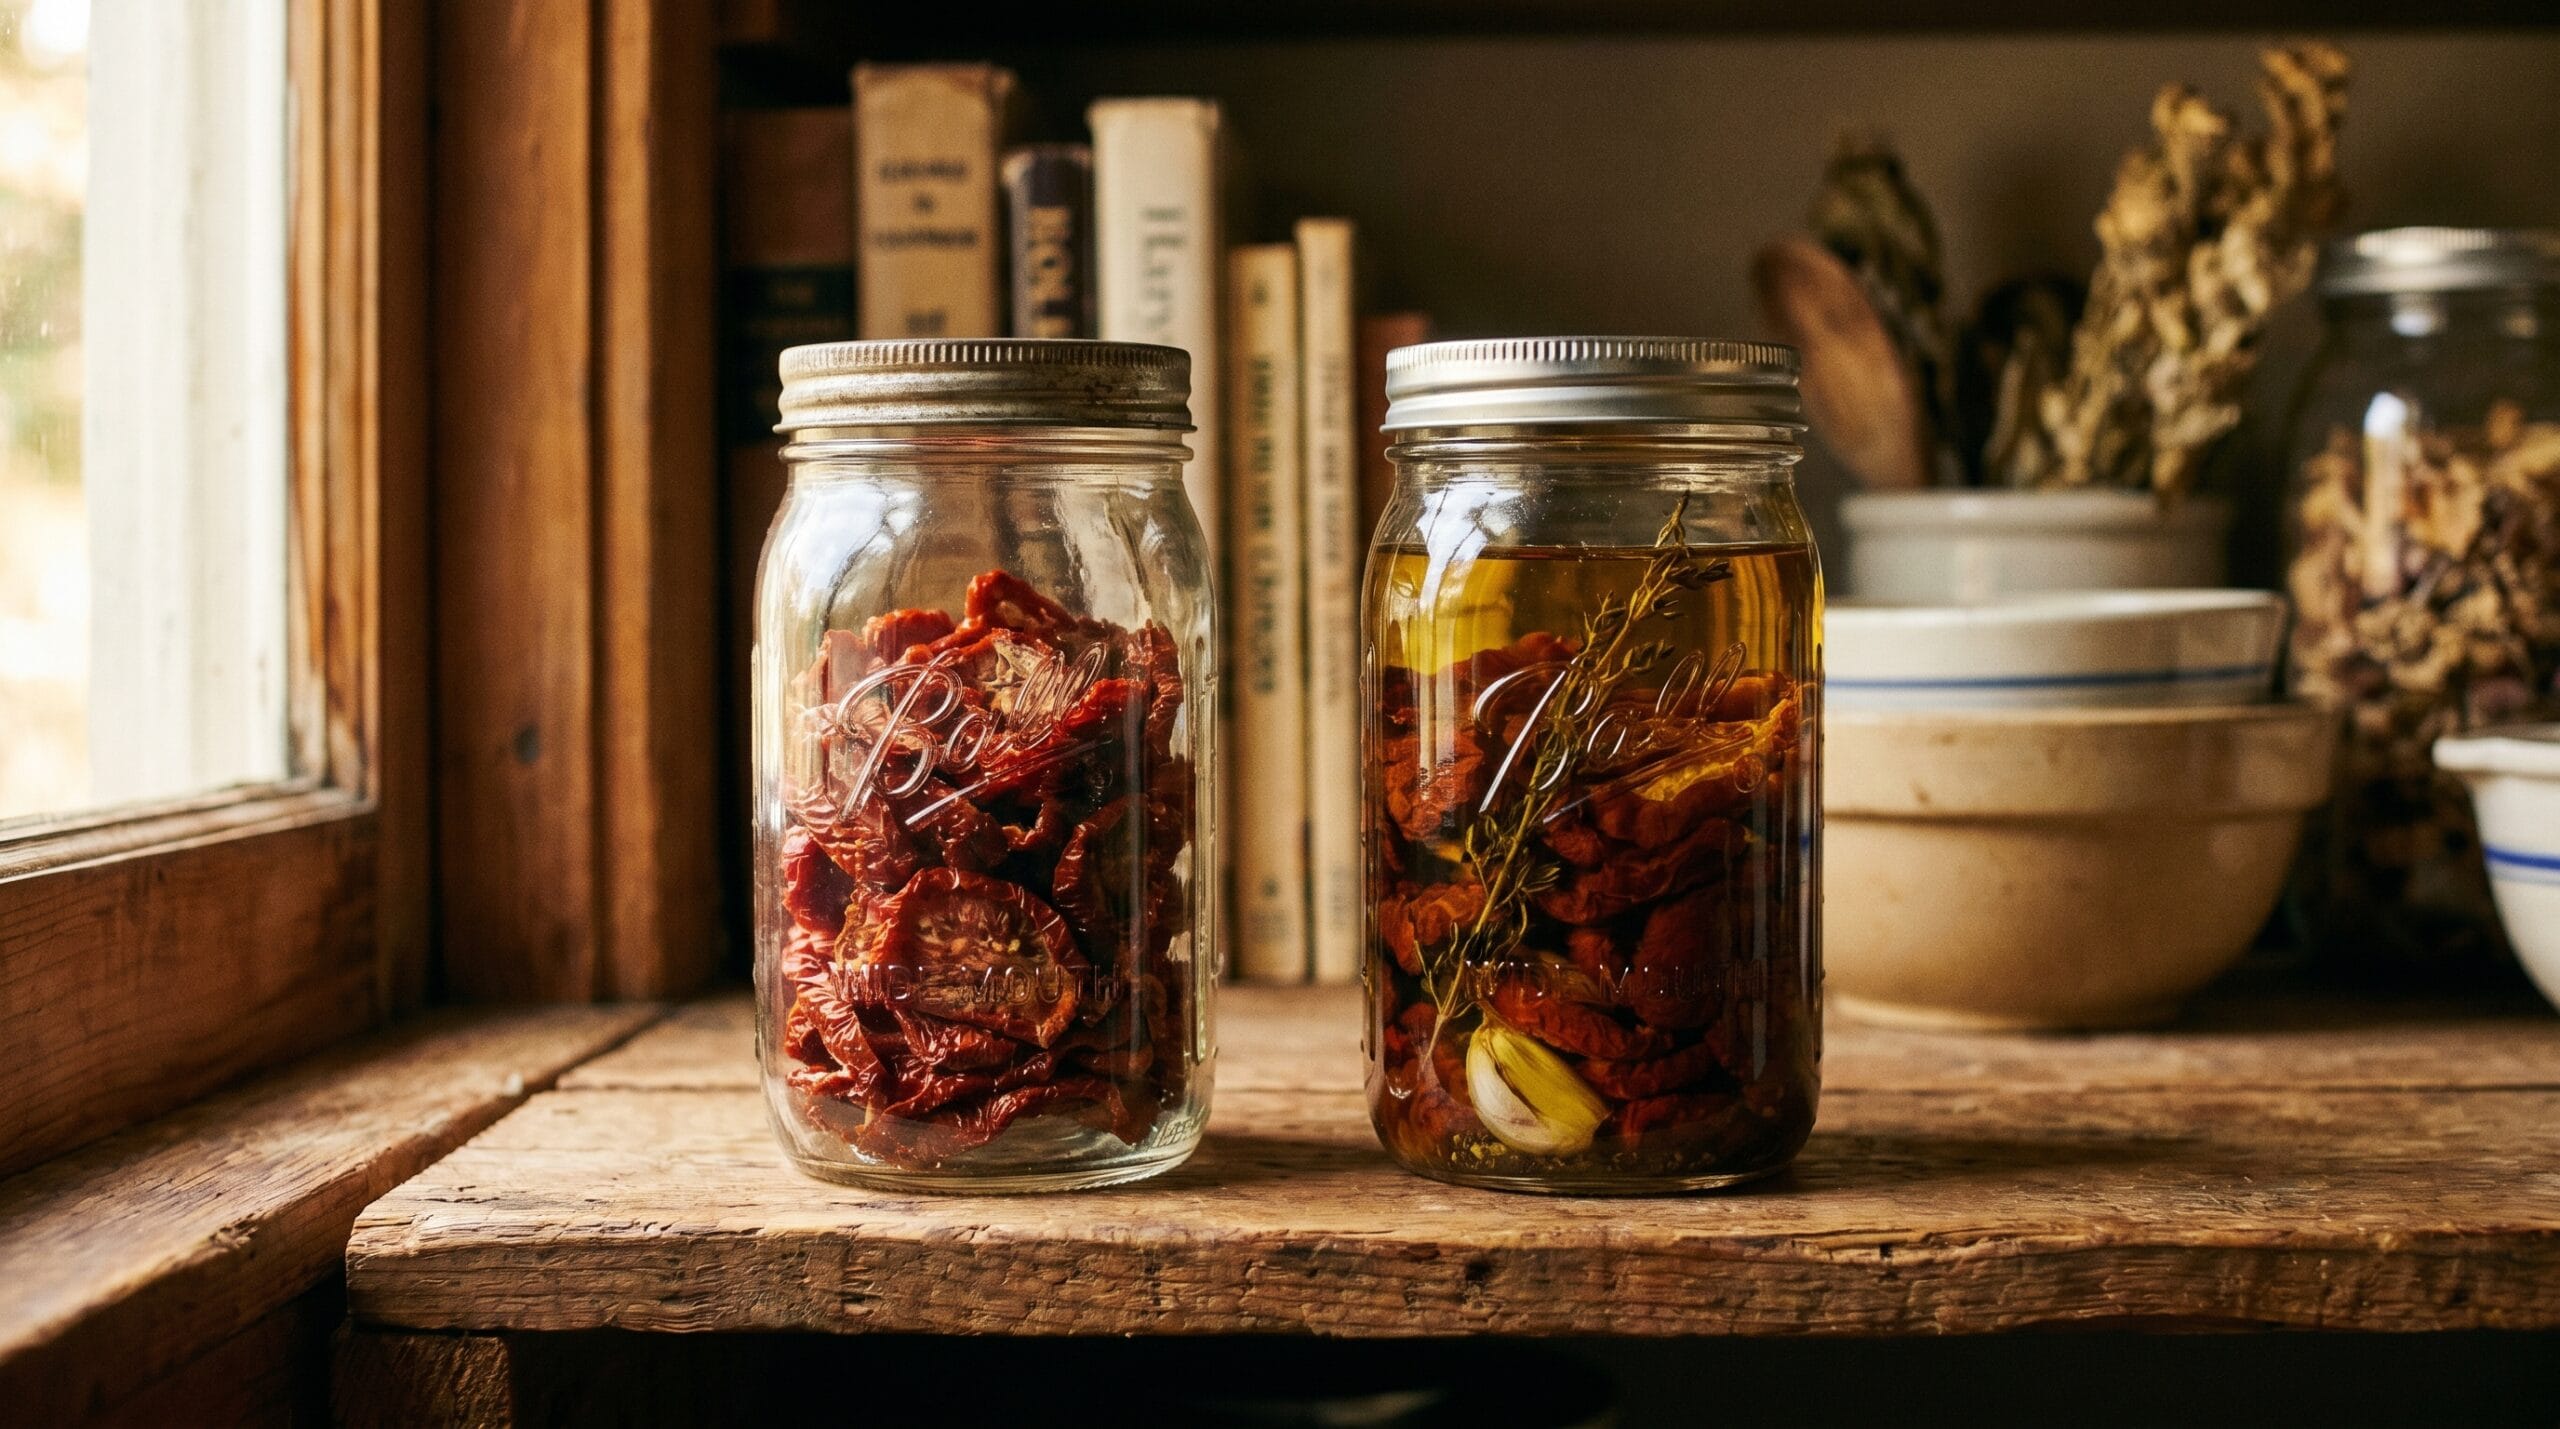
Dry-Pack Storage
Place fully dried tomatoes in an airtight container: a mason jar with a tight lid, a zip-top bag with the air pressed out, or a sealed glass container. Store at room temperature in a cool, dark place. Kept this way, properly dried tomatoes last up to 12 months. Label with the date you made them.
This is the lowest-risk storage method. No refrigeration required, no safety complications.
Oil-Pack Storage
Oil-packed sun-dried tomatoes are what you find in most grocery stores, and they are easy to make at home. Place fully dried tomatoes in a clean mason jar, cover completely with olive oil, add garlic or herbs if you like, and seal with a lid.
Here is the safety issue: the NCHFP warns that oil-packed sun-dried tomatoes stored at room temperature carry a botulism risk if not properly acidified or refrigerated. Garlic submerged in oil without acidification is a known risk environment for Clostridium botulinum, a pathogen that produces no smell or visible spoilage. The fix is straightforward: store oil-packed tomatoes in the refrigerator and use them within approximately 2 to 4 weeks as a conservative guideline. If you want to keep them longer, freeze the jar — but leave at least an inch of headspace and confirm the jar is rated for freezer use, or transfer to a freezer-safe bag instead.
Do not store oil-packed tomatoes at room temperature, even in a cool pantry. The risk is real and entirely avoidable.
The flavored oil left in the jar after the tomatoes are gone is worth keeping. It picks up the tomato and herb flavor during storage and works well in salad dressings or for sautéing.
How to Use Sun-Dried Tomatoes in Cooking
Once you have a jar ready, the applications are fairly broad.
Dry-packed tomatoes need to be rehydrated before most uses. Soak them in warm water for 20 to 30 minutes until they soften and become pliable. For cooked dishes, simmer them in broth for a few minutes instead of plain water, they absorb some of the broth and come out with deeper flavor.
Oil-packed tomatoes can go straight from the jar into nearly anything. A few practical uses:
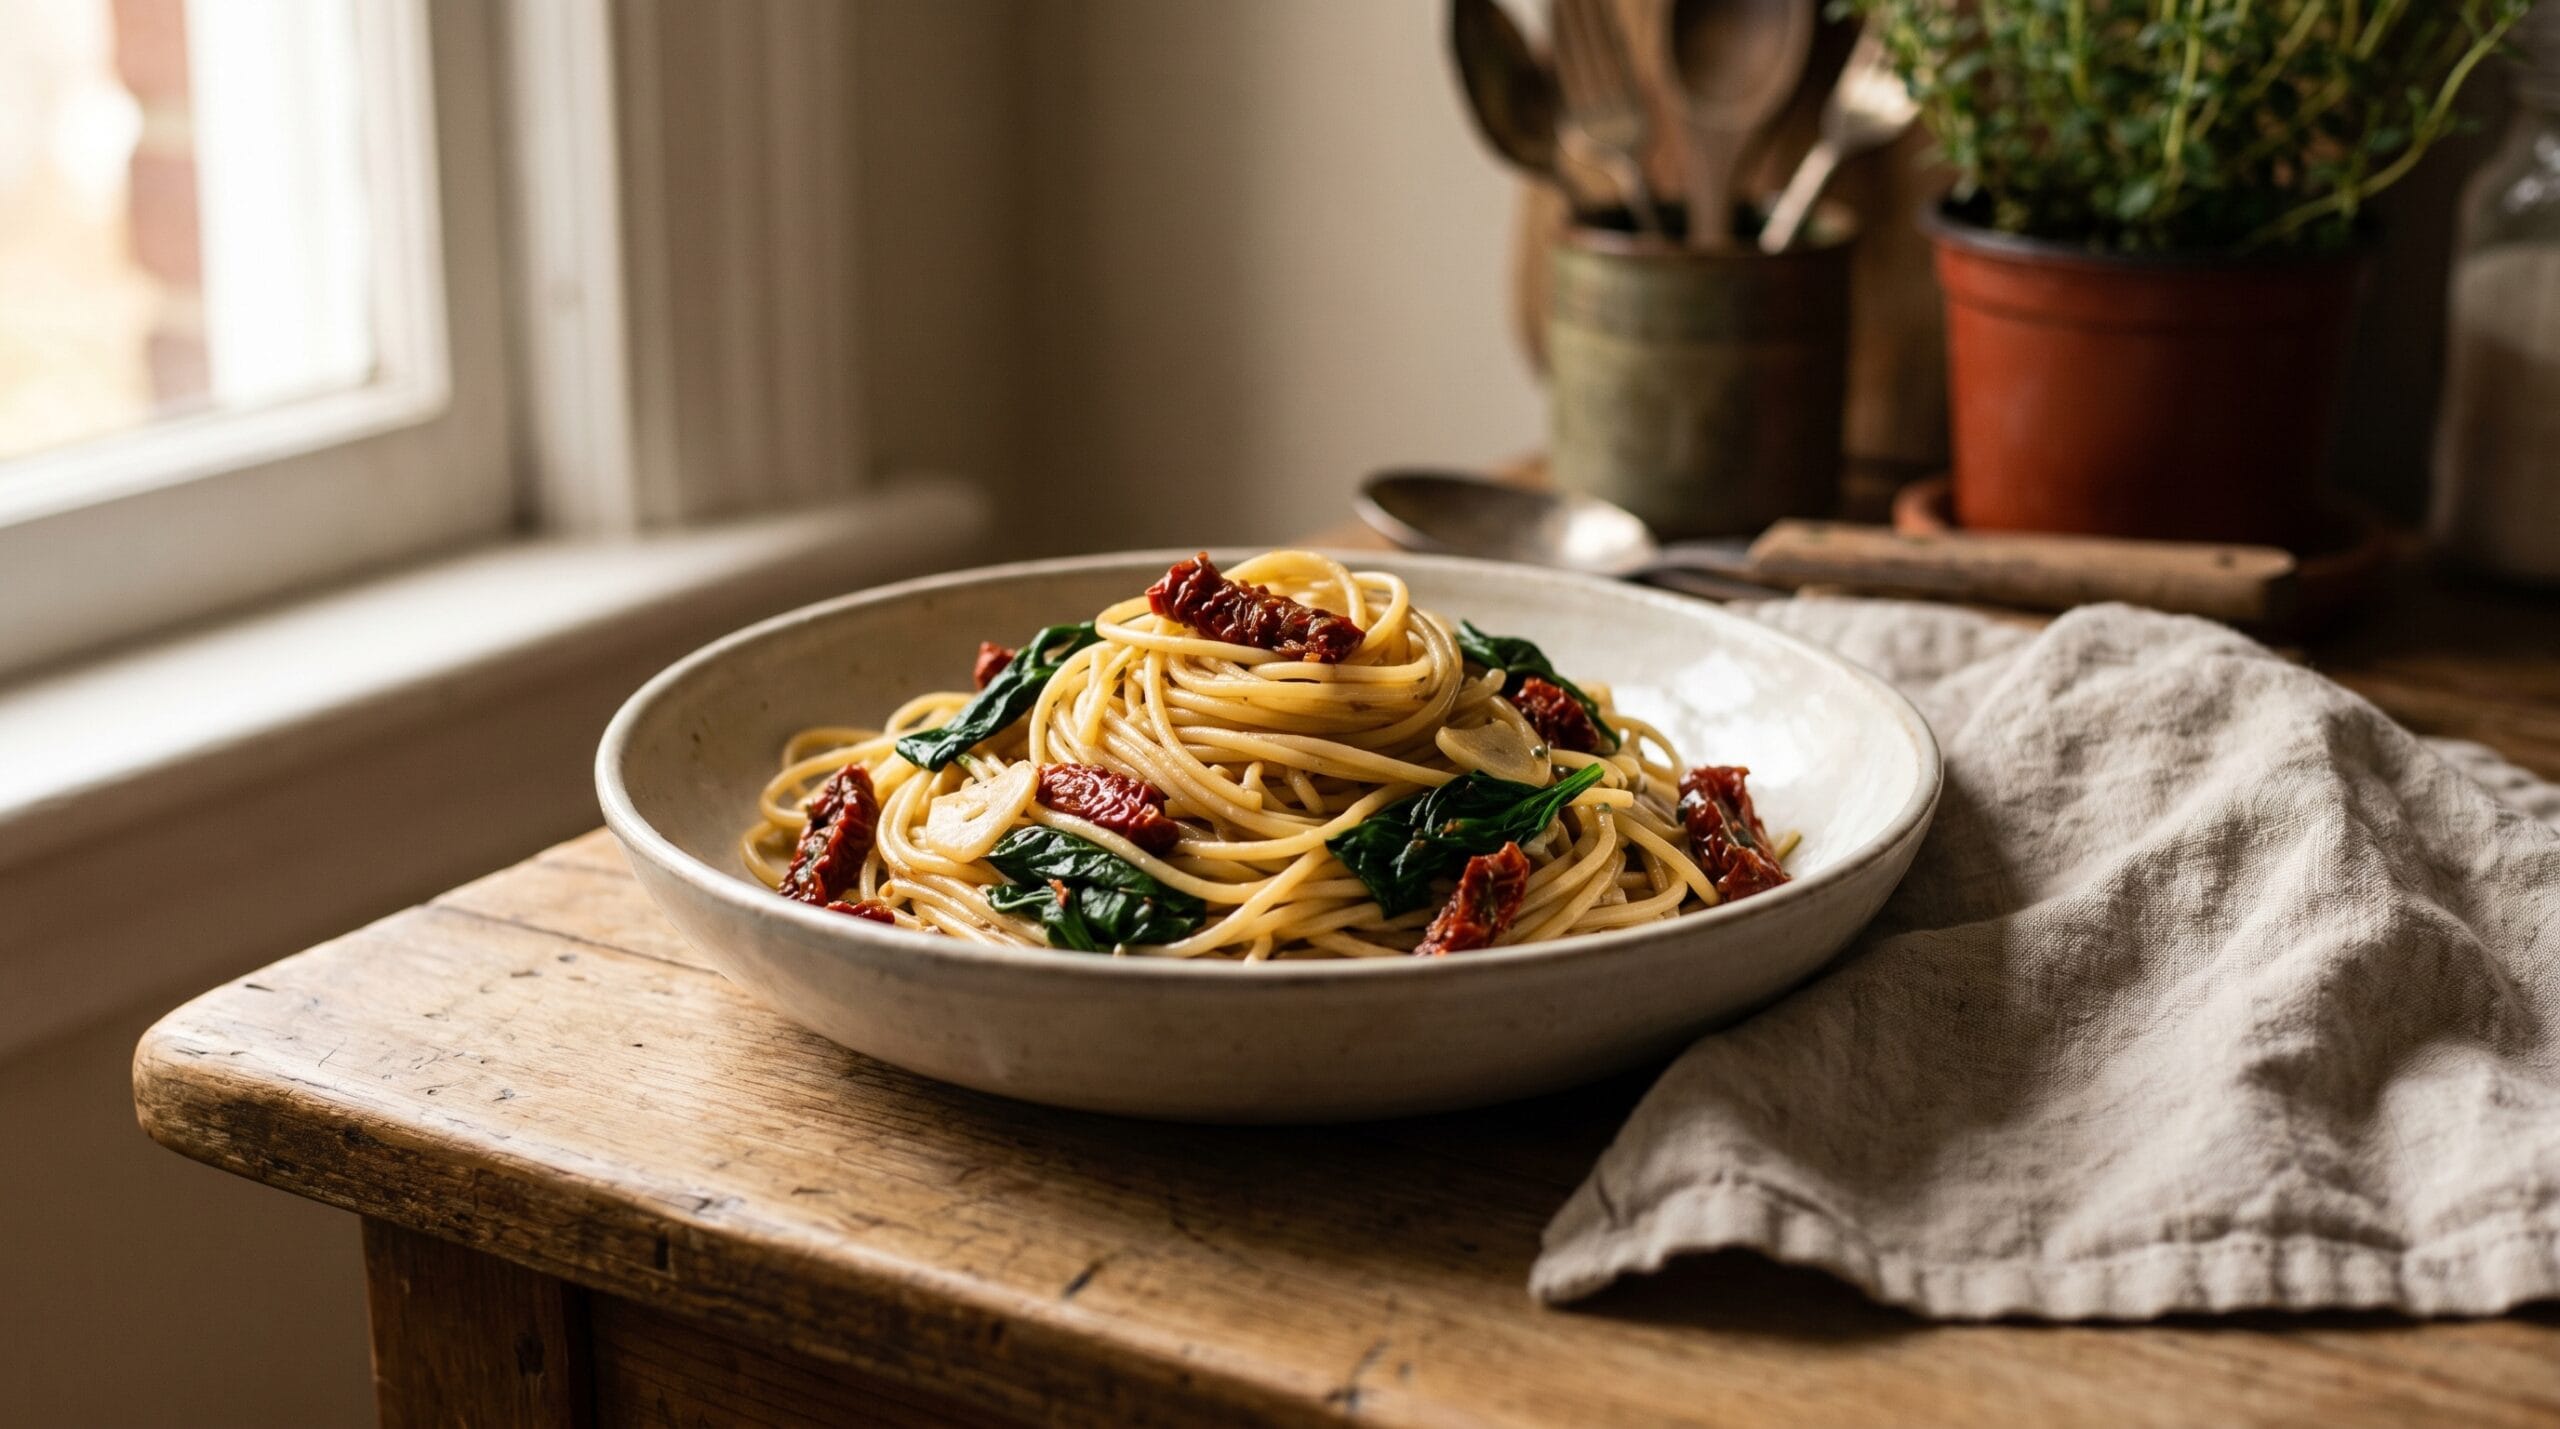
- Chop and stir into pasta with olive oil, garlic, and wilted spinach or kale.
- Lay onto flatbread with ricotta and fresh herbs.
- Add to grain bowls, scrambled eggs, or frittatas.
- Blend with olive oil, lemon, and garlic to make a quick pasta sauce or vinaigrette.
- Dice finely and fold into potato dishes, a roasted potato hash with sun-dried tomatoes and onion is a simple weeknight option.
- Add to soups and stews in the last 15 to 20 minutes for concentrated tomato flavor without added liquid.
The one adjustment to make when cooking with dry-packed rehydrated tomatoes: they will be less rich than oil-packed. Add a small amount of olive oil to the pan or dish to compensate.
Frequently Asked Questions About Sun-Dried Tomatoes
Can I use regular tomatoes for sun-dried tomatoes?
You can use any tomato, but the result varies significantly by type. Roma and paste tomatoes give the best result because of their low moisture content and thick walls. Large slicing or beefsteak tomatoes have too much juice and tend to dry unevenly. Cherry tomatoes work in smaller batches if you halve them and expect longer drying times on the smaller pieces.
How long does each drying method take?
The oven method takes 4 to 8 hours at 200 to 225°F, plus about 30 minutes of prep and cooling. The dehydrator takes 10 to 18 hours at 135°F and can run overnight. The sun method takes 3 to 5 full calendar days and requires consecutive days above 95°F with low humidity.
How do I know when sun-dried tomatoes are done?
Done sun-dried tomatoes are flexible and bend without cracking, but they should not feel wet or sticky. Let them cool completely before testing, since heat makes them feel more pliable than they actually are. If any pieces feel soft after cooling, return them to the oven or dehydrator rather than storing them.
Are sun-dried tomatoes safe to eat with high cholesterol, diabetes, or IBS?
Sun-dried tomatoes are low in fat and contain fiber and lycopene, but they are also concentrated in sodium if salted during preparation, which matters for anyone watching blood pressure or sodium intake. For blood sugar management, they are lower in carbohydrates than many dried fruits but still more calorie-dense than fresh tomatoes. For IBS, tomatoes are a moderate FODMAP food; sun-dried tomatoes in oil may be more concentrated and some people find them harder to tolerate in quantity. For any specific dietary concern, a conversation with a physician or registered dietitian is the right next step. This article is not a medical reference.
How do you make sun-dried tomatoes in oil at home?
Pack fully dried (flexible, not brittle) tomato halves into a clean mason jar, cover completely with olive oil, and add garlic or herbs if you like. Seal with a lid and refrigerate immediately. Use within approximately 2 to 4 weeks. Do not store oil-packed tomatoes at room temperature, the combination of garlic and oil creates conditions where botulism can develop without any visible signs of spoilage.
Wrapping Up
Sun-dried tomatoes are one of the more practical preservation projects a beginner can start with. No canning equipment, no pressure gauges, no elaborate setup — just tomatoes, salt, heat, and time. A dry-packed jar keeps for months and adds depth to dishes that would otherwise need a can of tomatoes from the store. An oil-packed jar in the refrigerator is ready to use straight from the jar for the next few weeks.
Start with the oven method and a few pounds of Romas. The crop does not need to be large. Even a single tray of tomatoes gives you enough to see how the process works and what finished texture actually feels like before you scale up.